Open Source Files
Neome OpenSource
Download the source files, run local clients, connect your browser, terminal, database, API tools, and AI backends. Simple, deterministic, and yours.
Instructions
This extension connects your browser directly to NeomeAI. Once connected, you get a Client ID that you paste into the Social Website node.
Step 1: Install the extension
- Download or extract the extension folder.
- Open chrome://extensions/.
- Enable Developer mode.
- Click Load unpacked.
- Select your extension folder.
Step 2: Open the extension
- Click the extension icon in Chrome.
- Open Neome Poster.
Step 3: Paste into Social Website node
- Add a Social Website node.
- Paste your Client ID into the node.
- Click Connect.
Keep Chrome open and stay logged into each platform you want to automate.
Each platform lives inside the CustomScripts folder, and background.js sends commands to the correct script.
background.js
manifest.json
popup.html
popup.js
CustomScripts/x.js
CustomScripts/reddit.js
CustomScripts/tiktok.js
CustomScripts/gmail.js
CustomScripts/telegram.js
Step 1: Add website permission
"host_permissions": [
	"https://x.com/*",
	"https://www.reddit.com/*",
	"https://www.tiktok.com/*",
	"https://mail.google.com/*",
	"https://web.telegram.org/*",
	"https://discord.com/*"
]
Step 2: Add the platform script
export async function handleCommand(data) {
	const action = String(data.action || "").trim().toLowerCase();
	if (action !== "post") return;

	// your platform logic here
}
Step 3: Connect it in background.js
import { handleCommand as handleDiscordCommand } from "./CustomScripts/discord.js";

const platformHandlers = {
	x: handleXCommand,
	reddit: handleRedditCommand,
	tiktok: handleTikTokCommand,
	gmail: handleGmailCommand,
	telegram: handleTelegramCommand,
	discord: handleDiscordCommand
};
Reload the extension from chrome://extensions/, then refresh the website tab.
The system uses simple command and event messages.
Command from Neome to browser
{
	"type": "cmd",
	"platform": "x",
	"action": "post",
	"text": "Hello from NeomeAI"
}
Event from browser to Neome
{
	"type": "event",
	"platform": "x",
	"event": "mention",
	"mention": {
		"author": "user",
		"text": "hey check this",
		"url": "https://x.com/..."
	}
}cmd tells the browser what to do. event tells NeomeAI what happened.No special platform required. Works on Mac, Linux, and Windows.
cd your-folder
python3 -m venv venv
source venv/bin/activate
pip install websockets==12.0
python3 client.py
When client.py starts, copy the Client ID and paste it into the Virtual Env node.
Windows
cd your-folder
py -m venv venv
.\venv\Scripts\activate
pip install websockets==12.0
py client.pyConfigure DB_PATH and DB_PASSWORD at the top of database.py.
cd your-folder
python3 -m venv venv
source venv/bin/activate
pip install websockets==12.0
python3 database.py
Copy the displayed Client ID into the Database node. Your database credentials stay inside database.py.
Run the terminal client locally, then paste its Client ID into the Terminal node.
cd your-folder
python3 -m venv venv
source venv/bin/activate
pip install websockets==12.0
python3 terminal.pyPaste your endpoint URL into API URL. No local client required.
GET
https://your-api.com/endpointPOST
POST https://your-api.com/endpoint
Content-Type: application/json
{"message":"Hello from NeomeAI"}
The response flows back into your workflow.
Cool endpoints
Jokes
https://official-joke-api.appspot.com/random_joke
https://v2.jokeapi.dev/joke/Any

Images
https://api.thecatapi.com/v1/images/search
https://dog.ceo/api/breeds/image/random
https://randomfox.ca/floof/
https://picsum.photos/800

Random
https://randomuser.me/api/
https://cataas.com/cat/says/NEOME

Food
https://www.themealdb.com/api/json/v1/1/random.php
https://www.thecocktaildb.com/api/json/v1/1/random.php

Feeds
https://zenquotes.io/api/random
https://api.spacexdata.com/v5/launches/latest
https://www.reddit.com/r/worldnews.json
https://www.reddit.com/r/artificial.json

RSS → JSON
https://api.rss2json.com/v1/api.json?rss_url=https://feeds.bbci.co.uk/news/rss.xml
https://api.rss2json.com/v1/api.json?rss_url=http://rss.cnn.com/rss/edition.rssThis is optional. Run your WebSocket server on your own domain when you want full control.
Install basics
sudo apt update
sudo apt install nginx python3 python3-venv certbot python3-certbot-nginx -y
Create project
cd /var/www/yourserver.com/WSserver
python3 -m venv venv
source venv/bin/activate
pip install websockets==12.0
Run server
nohup ./venv/bin/python server.py > server.log 2>&1 &Nginx reverse proxy
server {
	listen 80;
	listen [::]:80;
	server_name yourserver.com www.yourserver.com;

	location / {
		proxy_pass http://127.0.0.1:8888;
		proxy_http_version 1.1;
		proxy_set_header Upgrade $http_upgrade;
		proxy_set_header Connection "upgrade";
		proxy_set_header Host $host;
		proxy_set_header X-Real-IP $remote_addr;
		proxy_set_header X-Forwarded-For $proxy_add_x_forwarded_for;
		proxy_set_header X-Forwarded-Proto $scheme;
	}
}
SSL
sudo nginx -t
sudo systemctl reload nginx
sudo certbot --nginx -d yourserver.com -d www.yourserver.com
Use wss://yourserver.com as the endpoint in your node.
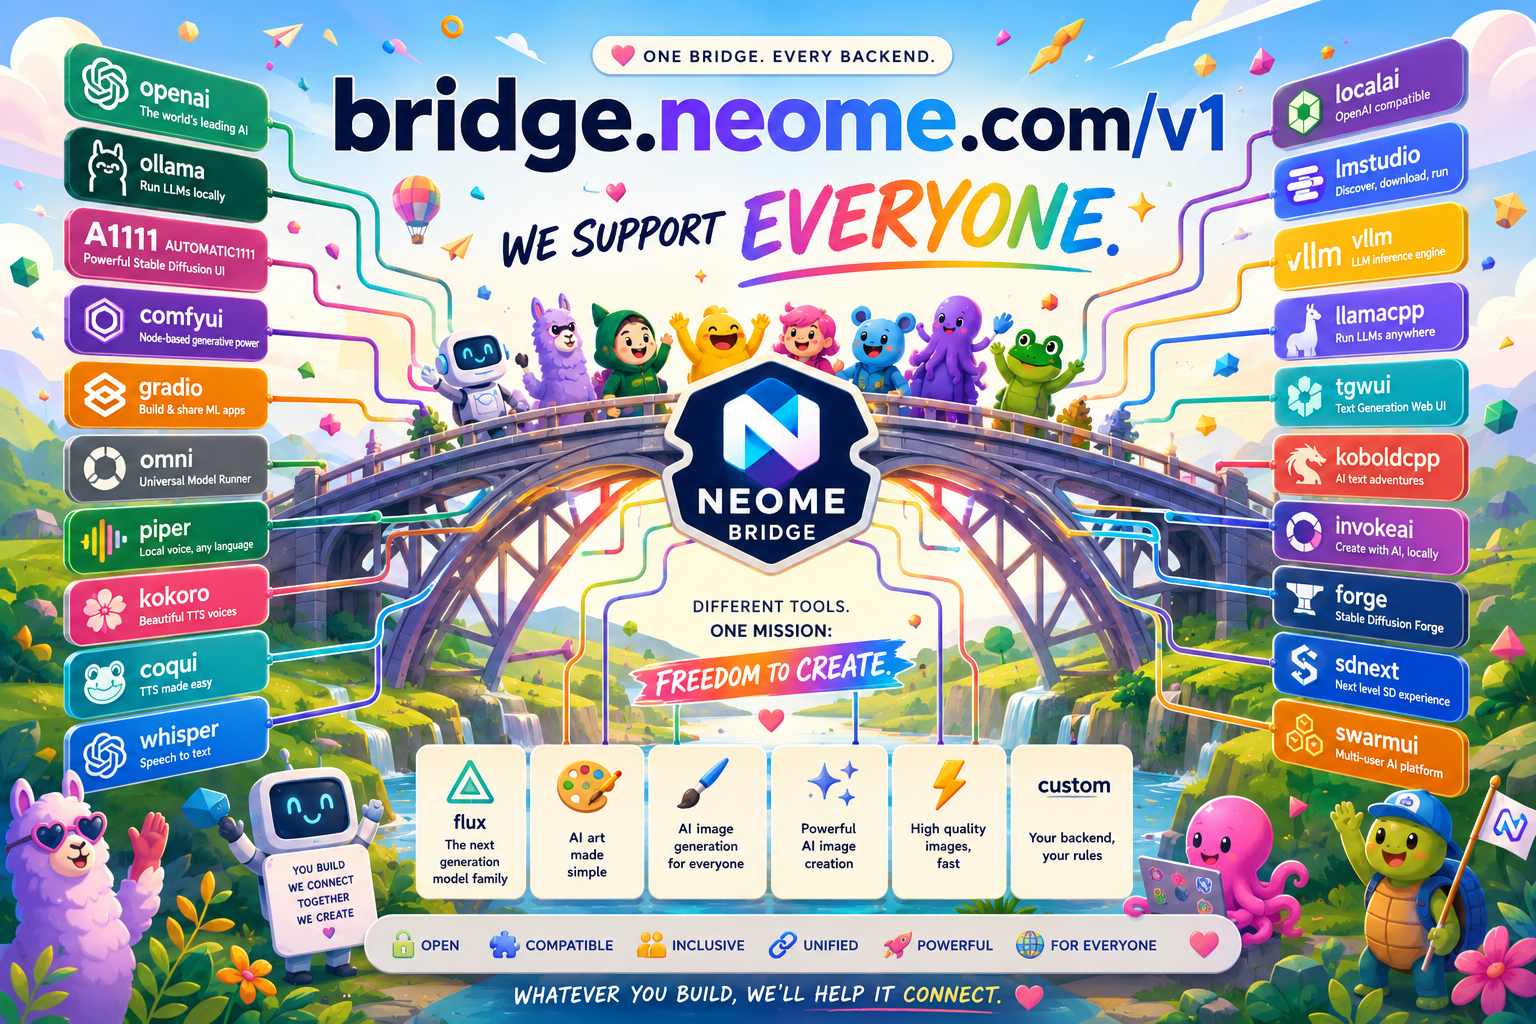
Bridge
bridge.neome.com/v1
Use the Neome hosted bridge or host your own. Same idea, same client, same clean routing. Connect OpenAI-compatible tools, local LLMs, image servers, voice engines, Whisper, Gradio apps, and custom endpoints.
Use Neome hosted
Fastest setup. Run only bridge.py and connect to https://bridge.neome.com/v1.
Self-host option
Run bridgeserver.py on your own server when you want full infrastructure control.
Every backend
Ollama, ComfyUI, vLLM, LocalAI, LM Studio, Gradio, Whisper, custom APIs, and more.
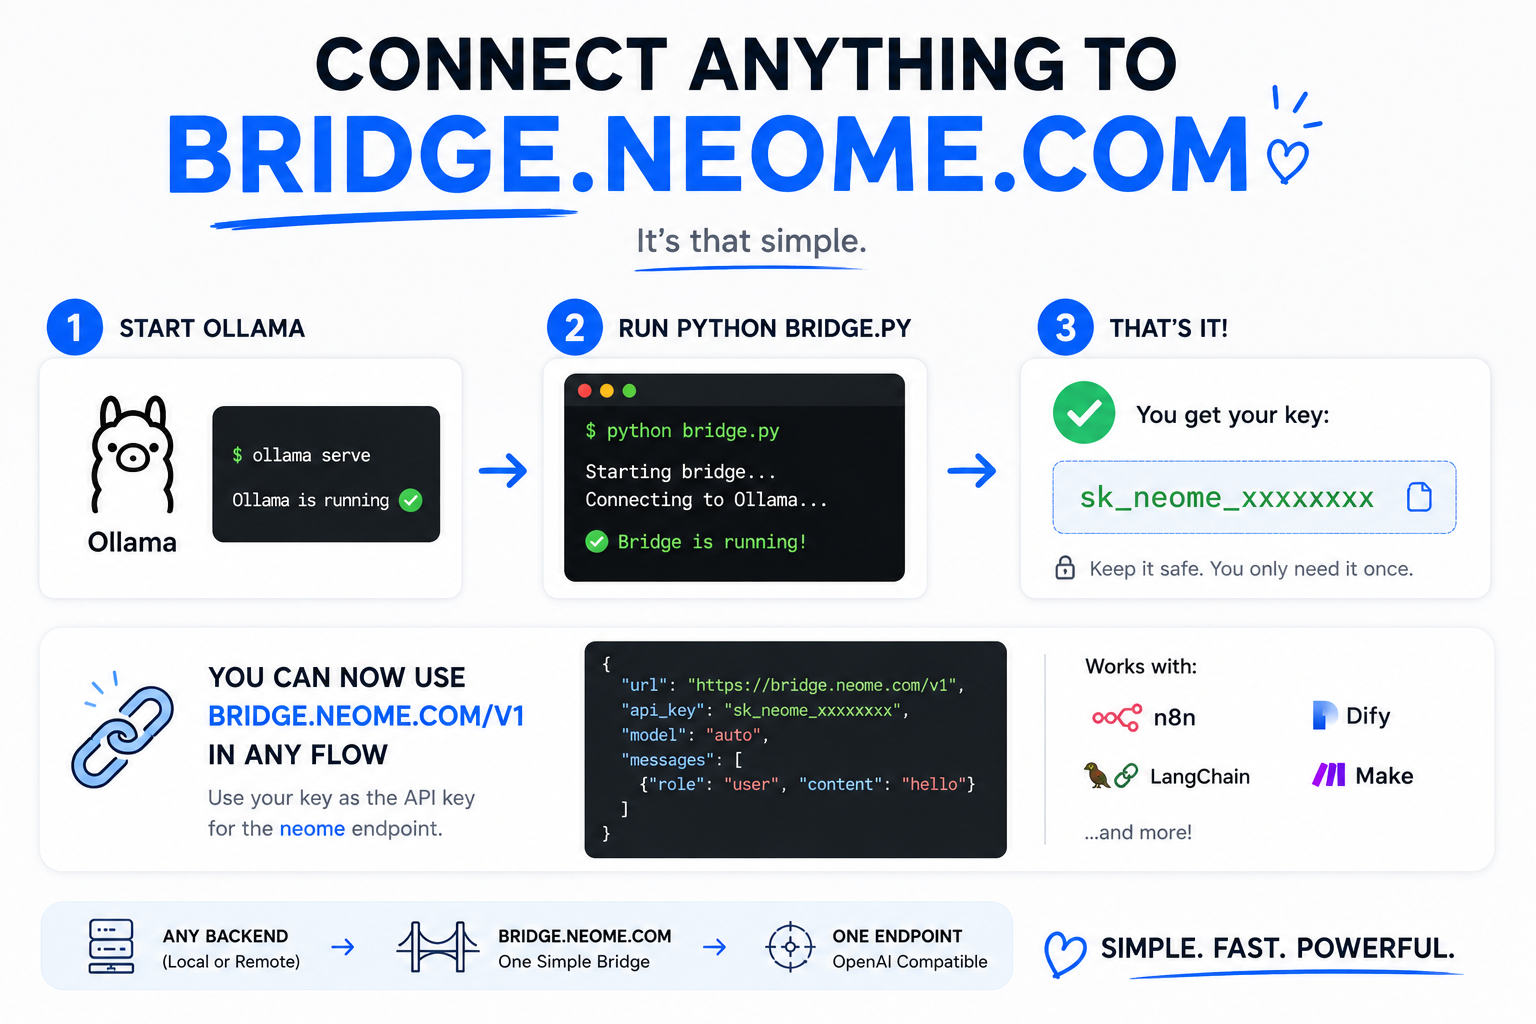
This is the recommended setup. Neome hosts bridgeserver.py. You only run bridge.py on your backend machine.
cd your-bridge-folder
python3 -m venv venv
source venv/bin/activate
pip install websockets requests
python3 bridge.py
Client config
SERVER_URL = "https://bridge.neome.com/v1"When bridge.py starts, it displays a Bridge Key:
sk_neome_xxxxxxxxxxxxxxxxxCopy this key and use it as the API key inside your NeomeAI endpoint.
This key identifies and routes requests through your connected bridge client.
Windows
cd your-bridge-folder
py -m venv venv
.\venv\Scripts\activate
pip install websockets requests
py bridge.pyThis is optional. Use it when you want your own public endpoint instead of https://bridge.neome.com/v1.
Run bridgeserver.py
cd /var/www/yourserver.com/bridge
python3 -m venv venv
source venv/bin/activate
pip install websockets aiohttp requests
python3 bridgeserver.py
Run in background
cd /var/www/yourserver.com/bridge
nohup ./venv/bin/python bridgeserver.py > bridgeserver.log 2>&1 &
Nginx example for /v1
server {
	listen 80;
	server_name yourserver.com;

	location /v1/ {
		proxy_pass http://127.0.0.1:8888/;
		proxy_http_version 1.1;
		proxy_set_header Upgrade $http_upgrade;
		proxy_set_header Connection "upgrade";
		proxy_set_header Host $host;
		proxy_set_header X-Real-IP $remote_addr;
		proxy_set_header X-Forwarded-For $proxy_add_x_forwarded_for;
		proxy_set_header X-Forwarded-Proto $scheme;
		proxy_read_timeout 300;
		proxy_send_timeout 300;
	}
}
Install SSL
sudo nginx -t
sudo systemctl reload nginx
sudo certbot --nginx -d yourserver.com
Client config for self-hosted bridge
SERVER_URL = "https://yourserver.com/v1"curl https://bridge.neome.com/v1/chat/completions \
-H "Authorization: Bearer sk_neome_xxxxx" \
-H "Content-Type: application/json" \
-d '{
"backend": "ollama",
"model": "auto",
"messages": [
{
"role": "user",
"content": "hello"
}
]
}'| Parameter | Description |
|---|---|
type | Request type (chat, completion, embedding, image, image_edit, image_variation, stt, tts, video, video_edit) |
model | Model name or auto selection |
messages | OpenAI chat message array |
prompt | Generation prompt |
input | Input text |
image[] | Base64 image array |
video[] | Base64 video array |
audio[] | Base64 audio array |
negative_prompt | Exclude unwanted output |
size | Image dimensions (1024x1024) |
resolution | Video resolution (720p, 1080p) |
duration | Output duration in seconds |
fps | Frames per second |
n | Number of outputs |
seed | Deterministic generation seed |
steps | Inference iterations |
cfg_scale | Prompt guidance strength |
strength | Edit / img2img intensity |
temperature | Randomness for text |
top_p | Nucleus sampling |
top_k | Candidate token limit |
max_tokens | Maximum generated tokens |
stream | Enable streaming |
voice | TTS voice preset |
language | Language or auto detect |
speed | Speech speed multiplier |
format | Output format (png, jpg, wav, mp4) |
quality | Output quality |
response_format | base64, url, json |
metadata | Custom metadata object |
Neome supports a unified request format.
Use a single endpoint and select the operation using type.
Set backend: "auto" to automatically choose the one available on your backend.
| type | Equivalent OpenAI Route |
|---|---|
models | /v1/models |
chat | /v1/chat/completions |
completion | /v1/completions |
embedding | /v1/embeddings |
image | /v1/images/generations |
image_edit | /v1/images/edits |
image_variation | /v1/images/variations |
stt | /v1/audio/transcriptions |
translation | /v1/audio/translations |
tts | /v1/audio/speech |
video | /v1/videos/generations |
video_edit | /v1/videos/edits |
curl https://bridge.neome.com/v1 \
			-H "Authorization: Bearer sk_neome_xxxxx" \
			-H "Content-Type: application/json" \
			-d '{
				"type": "chat",
				"backend": "auto",
				"model": "auto",
				"messages": [
					{
						"role": "user",
						"content": "hello"
					}
				]
			}'
Simple mode:
backend: "auto" → automatic backend selection
model: "auto" → automatic model selection
Use custom for anything that does not fit a standard backend.
{
	"backend": "custom",
	"url": "http://127.0.0.1:8080/v1/chat/completions",
	"method": "POST",
	"headers": {
		"Content-Type": "application/json"
	},
	"body": {
		"model": "auto",
		"messages": [
			{"role": "user", "content": "hello"}
		]
	}
}